Here’s a breakdown of potential causes and solutions:
1. Server-Related Issues:
-
PHP Upload Limit:
Ensure your server’s PHP upload limit is high enough to handle the Divi theme file, as it might be larger than the default limit. You can increase this limit through your hosting control panel or by modifying the php.ini file.
-
Server Configuration:
Some hosting providers have restrictions on certain file types. If you’re using a very basic hosting plan, you might encounter limitations on uploading certain file types.
2. WordPress and Plugin Conflicts:
-
Outdated WordPress or Divi:
Make sure both your WordPress installation and the Divi theme are up to date. Outdated versions can cause compatibility issues.
-
Plugin Conflicts:
Certain plugins can interfere with the Divi Builder. Deactivate any plugins you suspect might be causing the issue and then reactivate them one by one.
-
Caching Issues:
Clear your website’s cache and browser cache. This can help resolve issues caused by outdated cached data.
- Check Server Settings: Consult your hosting provider for information on PHP upload limits and file permissions.
- Update Divi and WordPress: Ensure both are up to date in your WordPress dashboard.
- Deactivate Plugins: Deactivate all plugins except for Divi and try uploading again.
- Clear Cache: Clear your website’s cache and browser cache.
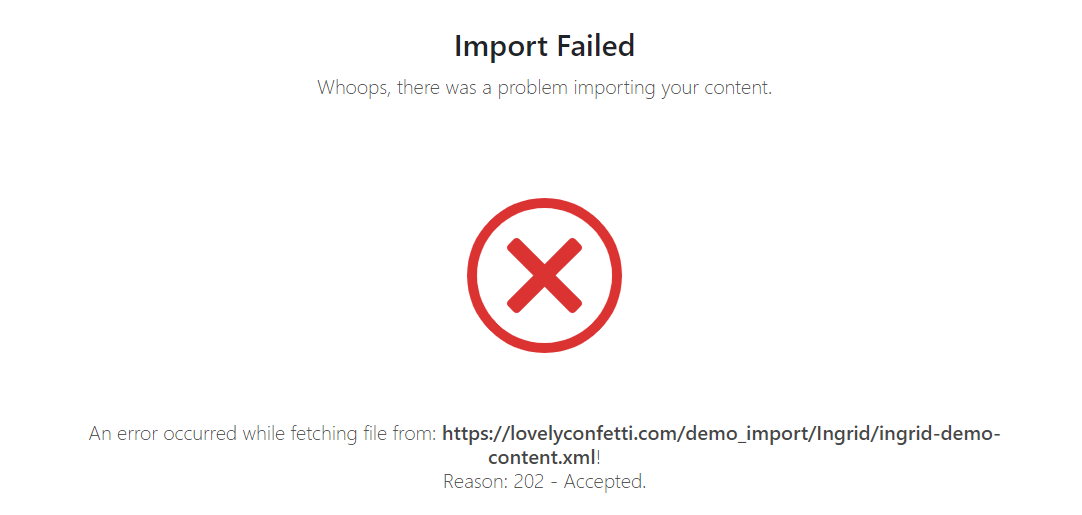
Error 202 “indicates that the request has been accepted for processing, but the processing has not been completed; in fact, processing may not have started yet. The request might or might not eventually be acted upon, as it might be disallowed when processing actually takes place”, see here.
The fix: You have to import demo manually.
Step 1: Import Demo Content
– Import The Demo XML file
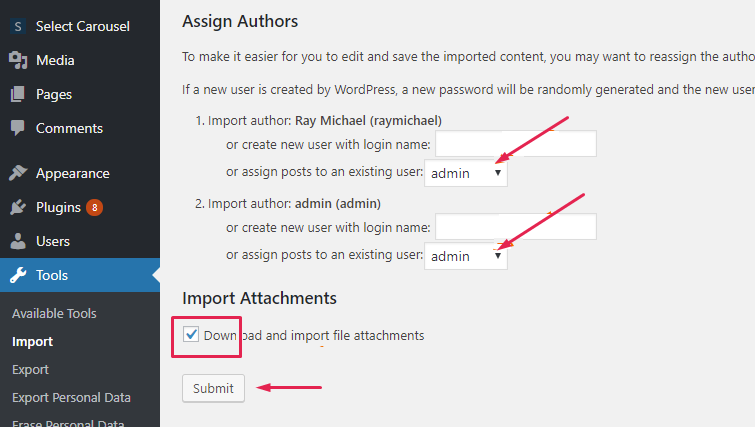
On your WordPress Dashboard, go to Tools → Import → WordPress.
- Install the WordPress Importer.
- Go to demo folder and browse for the XML file themename-demo-content.xml and import it.
- All of the demo content should now be uploaded to your site and ready to use.
– Import Demo Styles.
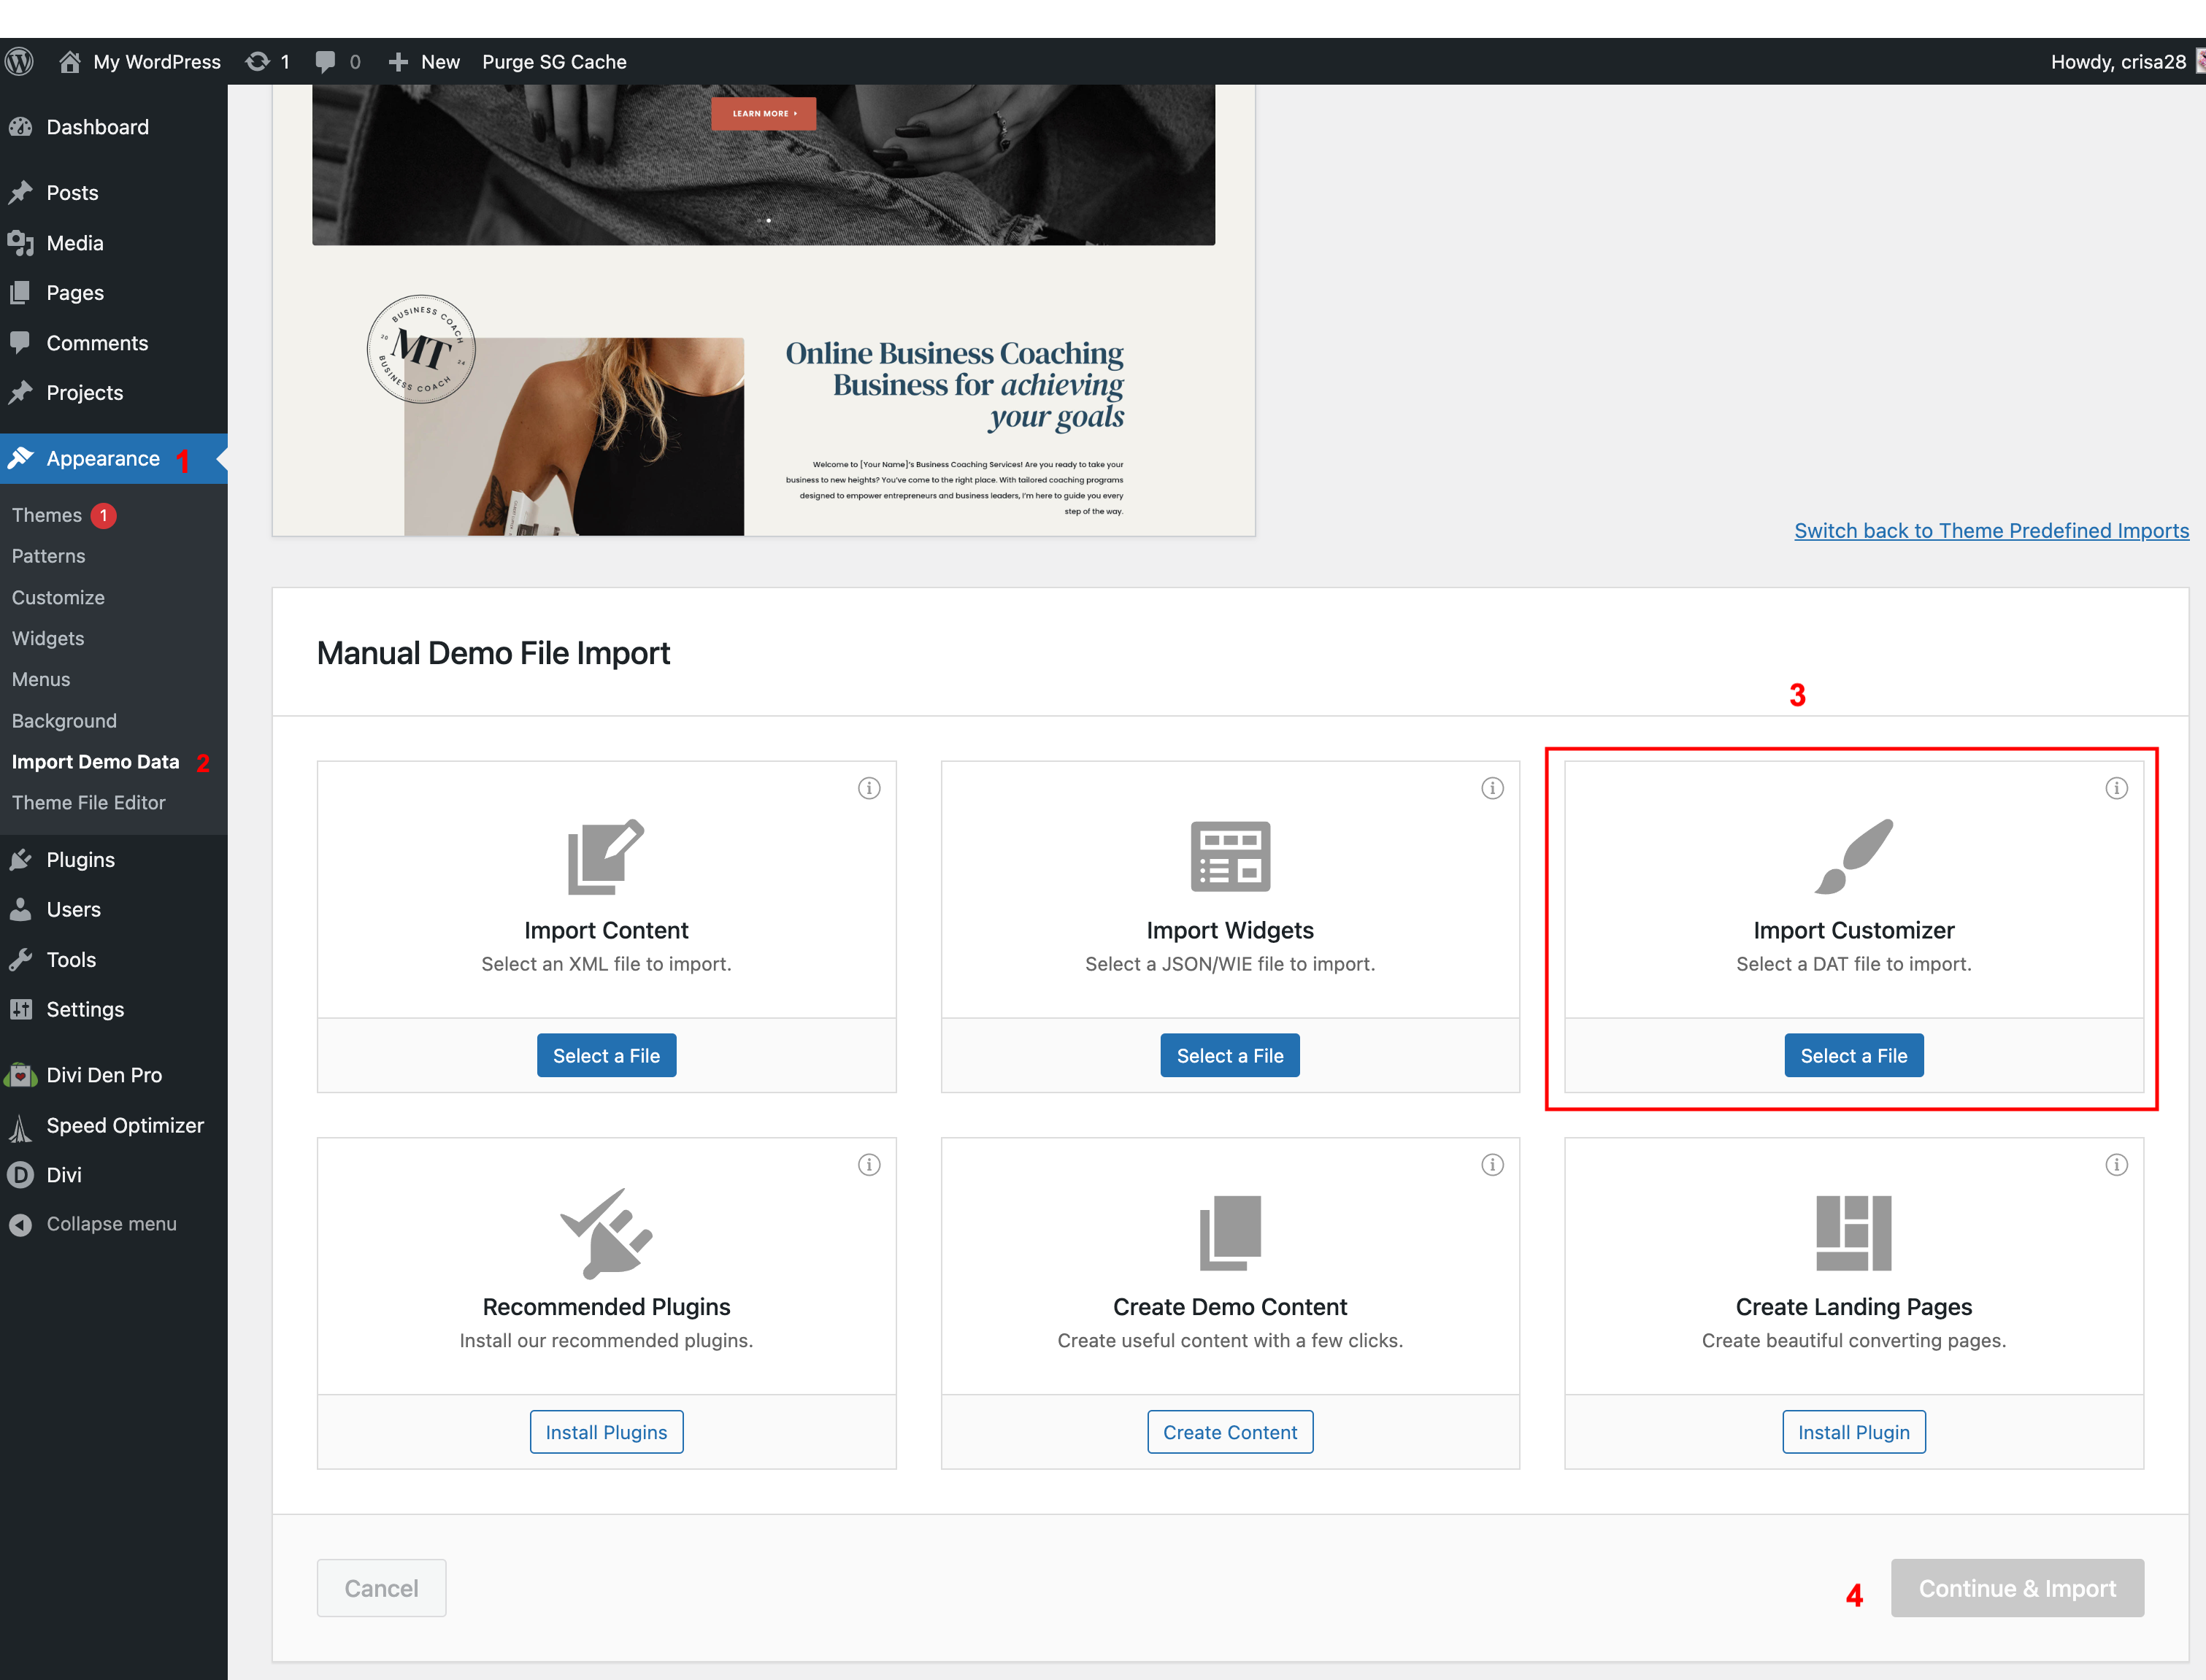
- On your WordPress Dashboard, go to Appearance → Import Demo Data → Switch to Manual Imports → Import Customizer
- Go to demo folder and browse for the XML file themename-customizer.dat and import it.
– Set Up the Front Page
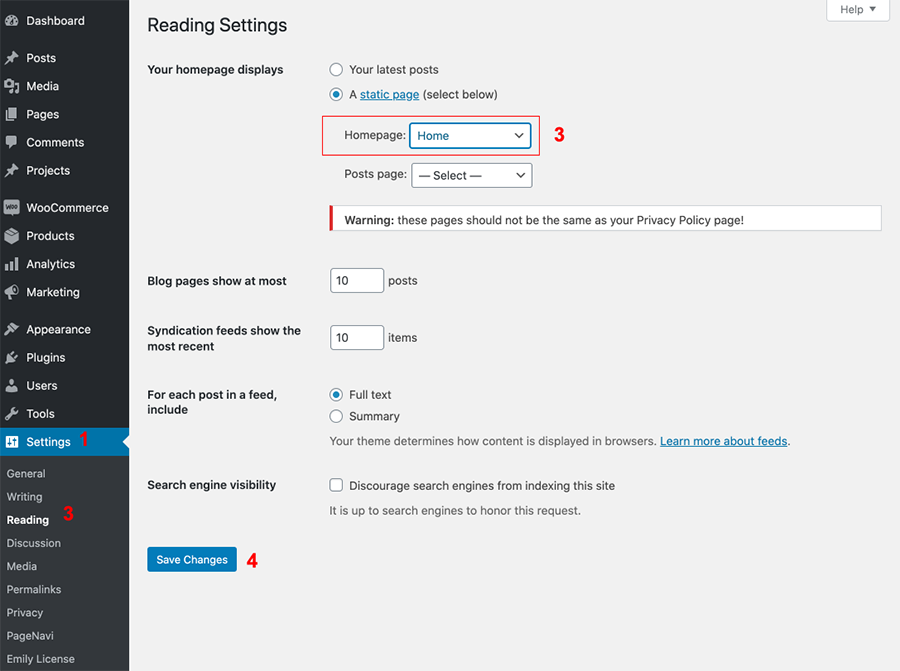
- Go to your WordPress Dashboard → Settings → Reading panel.
- Set ‘Front page displays:’ to ‘a static page’ and choose the home page.
- Save changes.
Step 2: Import DIVI Options
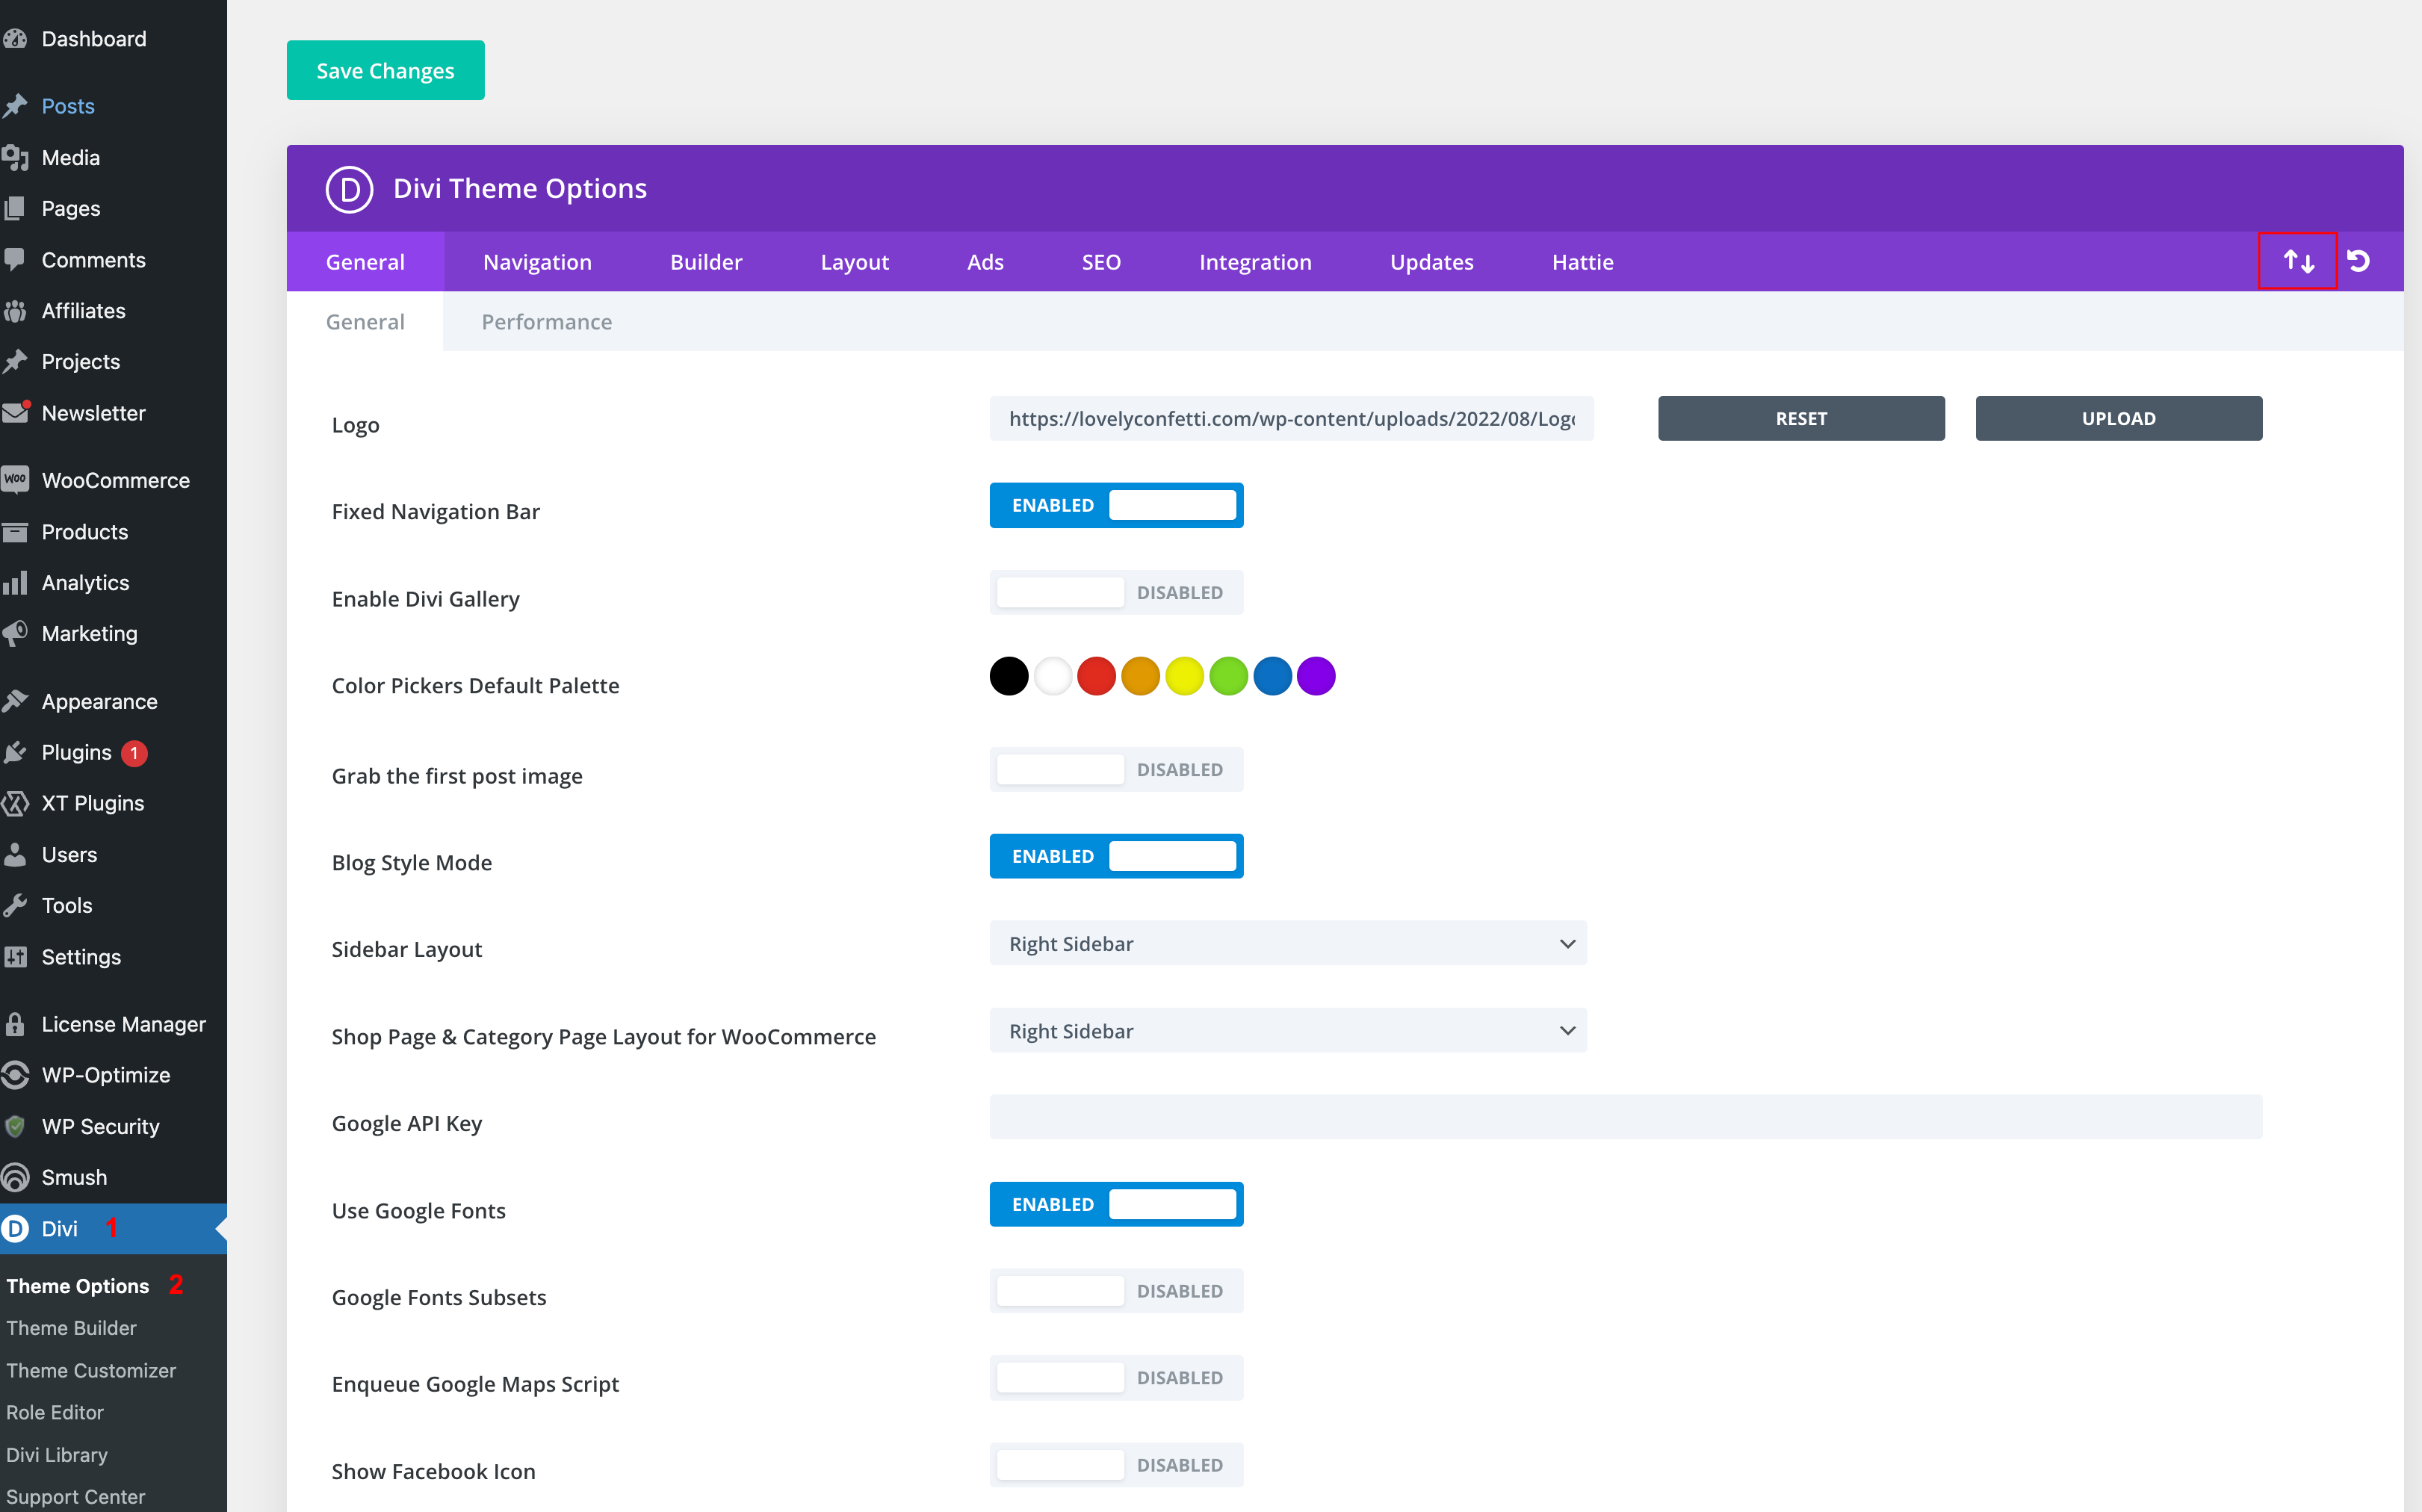
Go to Appearance > Divi > Theme Options >Click the “Import” tab at the top.
Then click “Choose file” and from your theme folder, choose “[Theme Name]-Theme-Options.json” and upload that. Then click “Import theme options” at the bottom of the popup. This can take a minute or so to complete. Once it has the page will refresh.
Step 3: Import DIVI Builder (Footer / Header)
The last step is to import Divi Theme Builder Templates.
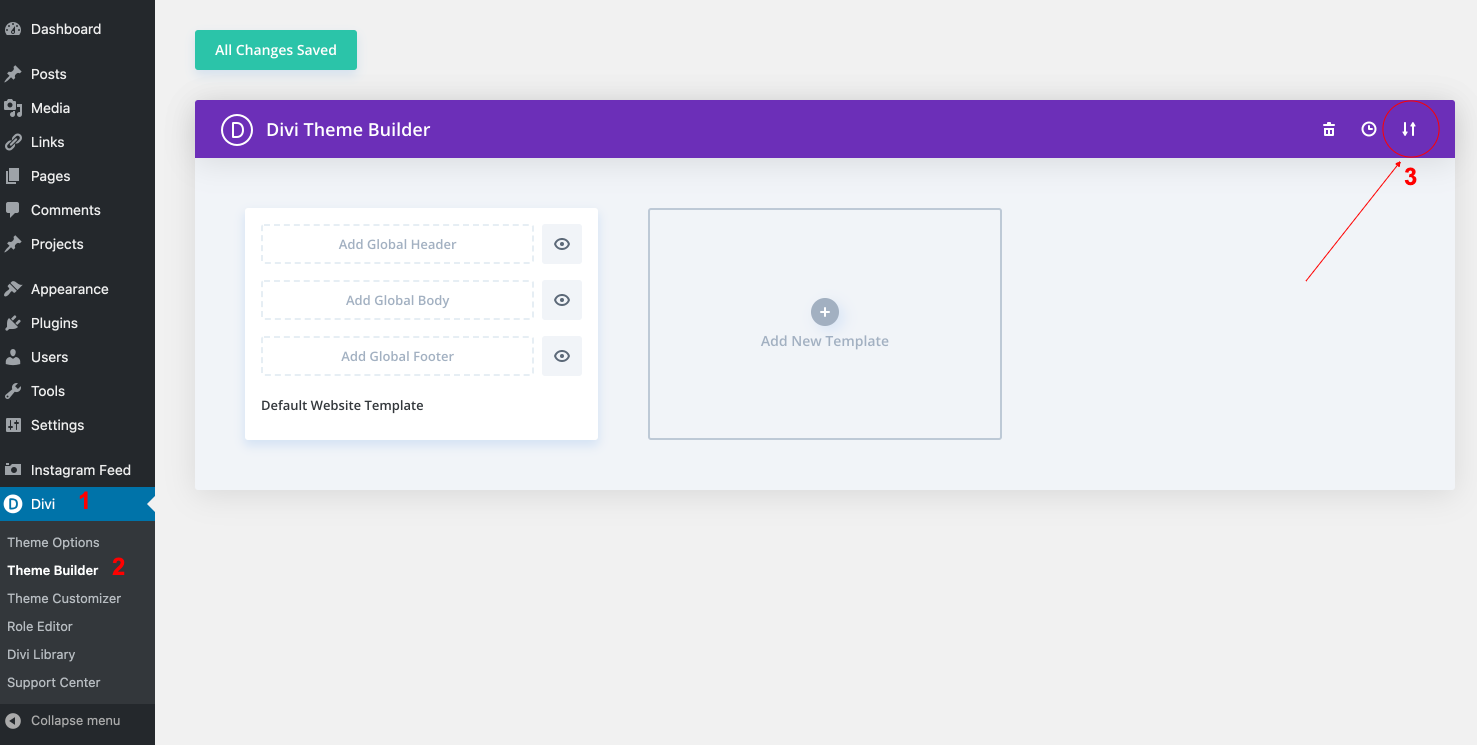
Go to Divi > Theme Builder > click to Portability Icon at the top .
Choose Yourtheme-Theme-Builder.json included in downloaded theme package and click Import Divi Theme Builder Templates and Save changes in Divi Theme Builder.
There actually is not an issue, and it is not a bug.
The issue where the Divi Email Optin module is not shown happens when you do not connect an email providers.
Without an email provider, there is not way to know what form fields are needed, and certainly no need for a form. So the solution is rather simple.
Just connect the form to your account, such as Mailchimp, Converkit, Mailalert,… and the form will show up on the frontend!
This happens when you are using WordPress.com host on Staging Mode (Site not launched yet).
You have to launch your site on live mode or use Safe Mode.
In your WordPress dashboard Navigate to Divi > Support Center and Enable Safe Mode.
This feature will disable all your plugins and child themes. After that check, if your Divi visual builder is loading. If your visual builder is now loading then one of your plugins might be the issue.
Jan 31, 2024: We are aware of a bug in WordPress 6.4.3 that is preventing zip files from uploading into WordPress.
Your Lovely Confetti Child Theme is a zip file, so you may encounter an “Incompatible Archive” error message when installing your theme on WordPress 6.4.3.
WordPress is aware of this issue (see this link) and is actively working on a fix.
Option 1:
While we await a bug fix from WordPress, here’s what to do if you encounter this error:
- Go to Plugins > Add New > Install and activate WP Downgrade.
- Once activated, go to Settings > WP Downgrade.
- In the WordPress Target Version box, type 6.4.2. Click Save Changes.
- Next, go to Dashboard > Updates and click “Re-Install Version 6.4.2.” This will downgrade you to WordPress 6.4.2.
- After downgrading, you can proceed with uploading your child theme as normal on your Themes page.
Once your theme is installed, deactivate and delete the WP Downgrade plugin.
You can then either upgrade to WordPress 6.4.3 again (this version works well other than this issue), or wait for the WordPress 6.4.4 release.
Option 2:
You can simply install “Force using PclZip” plugin and then all the zip installation will work normally.
- Download the plugin zip file from https://github.com/aaronjorbin/force-pclzip/archive/refs/tags/0.1.zip
- Go to “Plugins > Add New > Upload Plugin”, then browse and locate the plugin zip file you have downloaded
- Click on “Install Now” and then Activate the plugin.
- After this, you can upload the theme zip file from “Appearance > Themes > Add New > Upload child theme.
The WordPress community is working actively on resolving this issue in an upcoming release. By staying engaged with the WordPress community through forums and tracking updates, you can stay updated about the latest solutions and ensure your site remains unaffected.
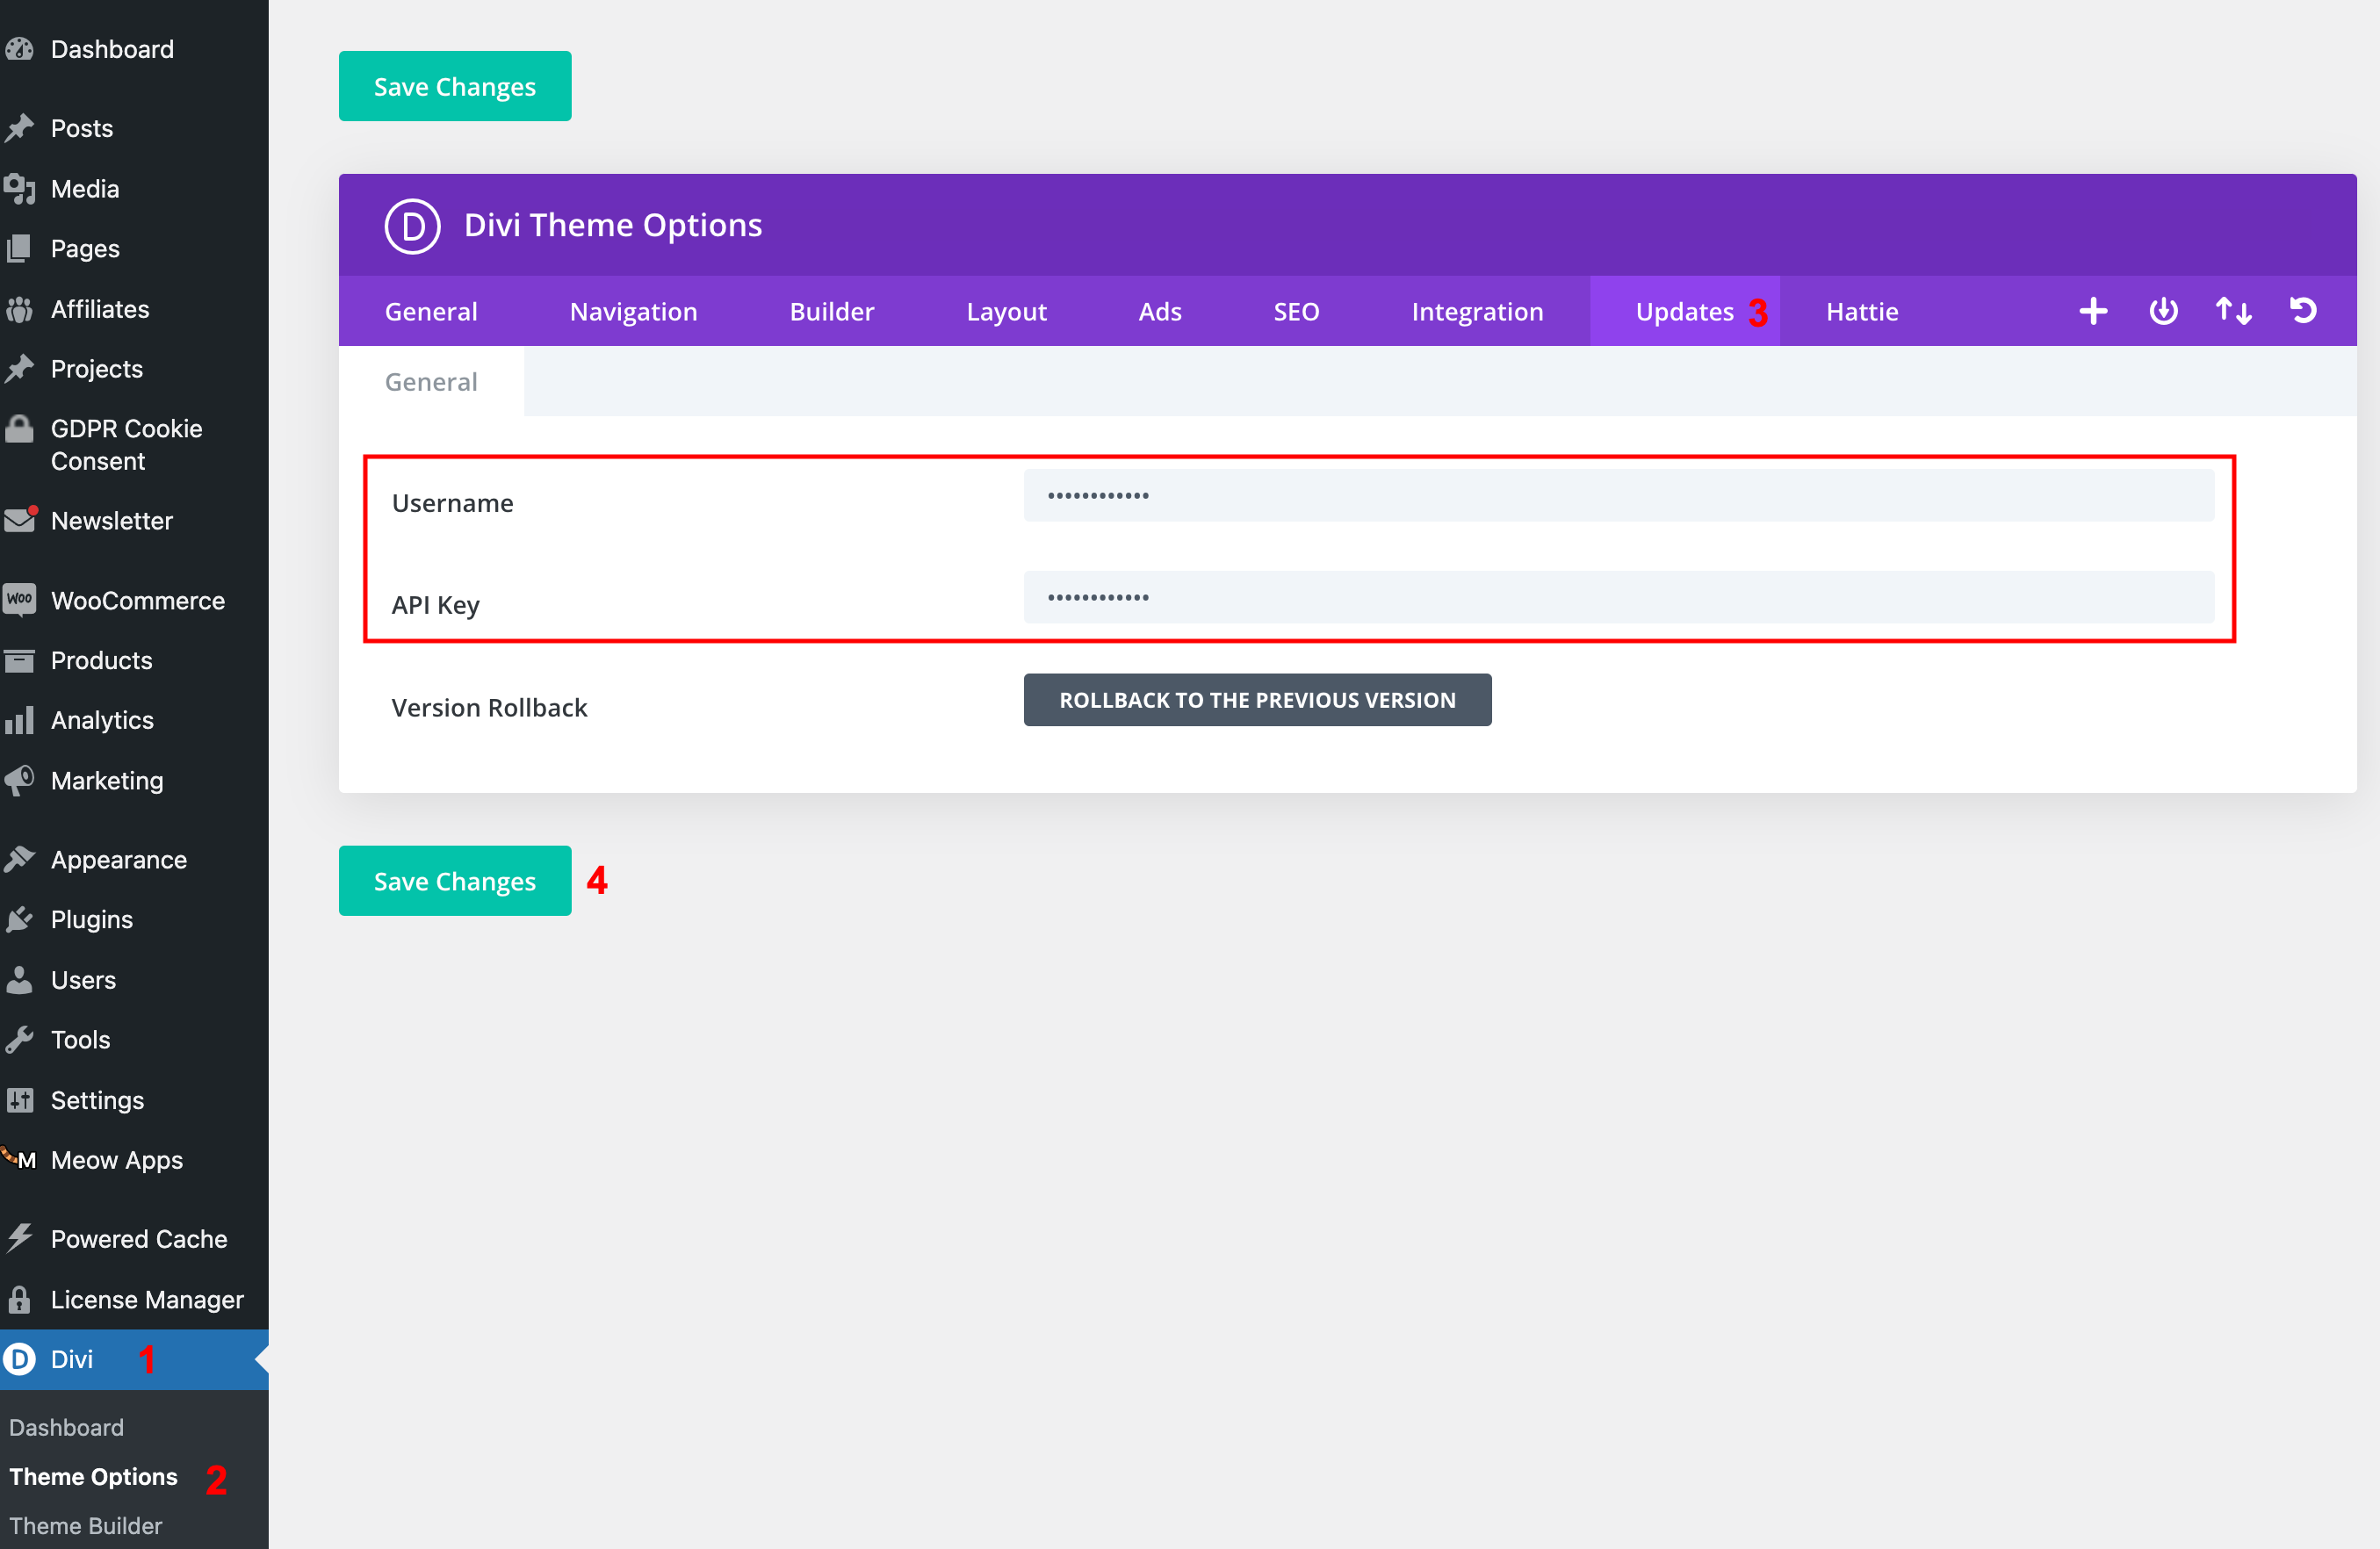
A you can see in product listing and FAQS, I offer a coy of Divi but if you want update the Divi theme to a newer version you will need an Elegant Themes license.
If you don’t yet have an Elegant Theme Licence, you can get one HERE and follow this TUTORIAL.
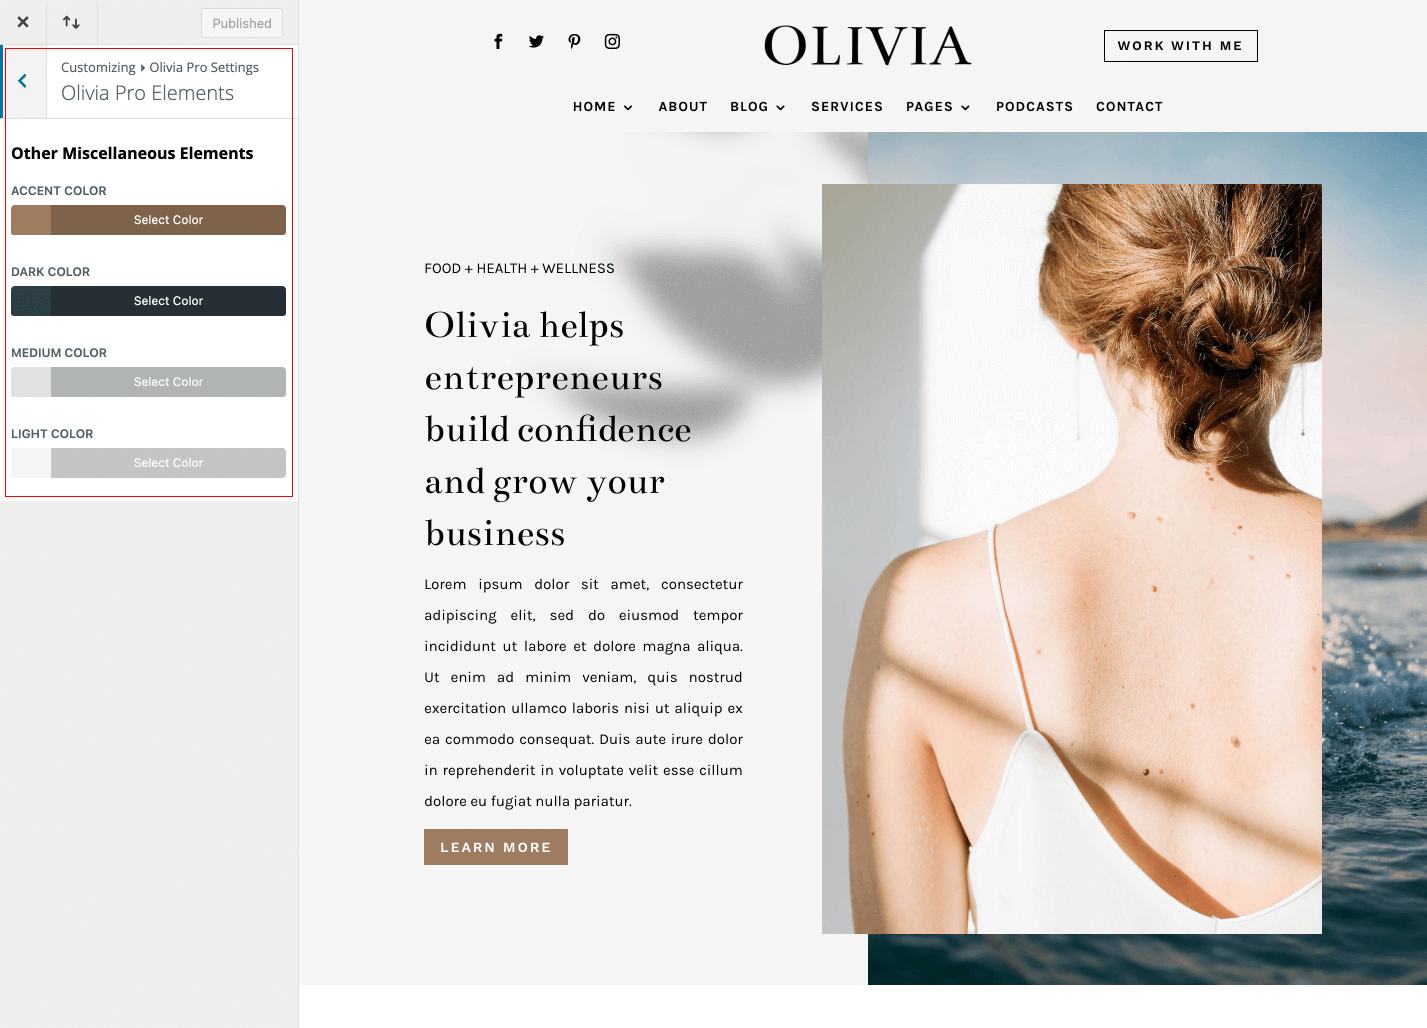
I’m trying to change the colors of the theme’s pre-styled but I can’t.
It does not work because the global theme´s customizer takes over.
The Fix: All themes have a global customizer.
Go to Divi > Customizer > Your Theme Settings > Your Theme Elements
You’ve got your theme installed and imported demo but footer and/or header does not look like demo.
The Fix: You have not imported Divi Theme Builder archive.
Go to Divi > Theme Builder > click to Portability Icon at the top .
To import the json file using the Divi Theme Builder, you will navigate to the same portability options within the Theme Builder by clicking the portability icon at the top right of the page.
Then select the Import Tab.
Choose Yourtheme-Theme-Builder.json included in downloaded theme package (DEMO ARCHIVES FOLDER) and click Import Divi Theme Builder Templates and Save changes in Divi Theme Builder.
If you are importing templates to an empty theme builder, the options don’t apply so you can leave them checked. We’ll cover overrides later in this post.
After that, click the import button.
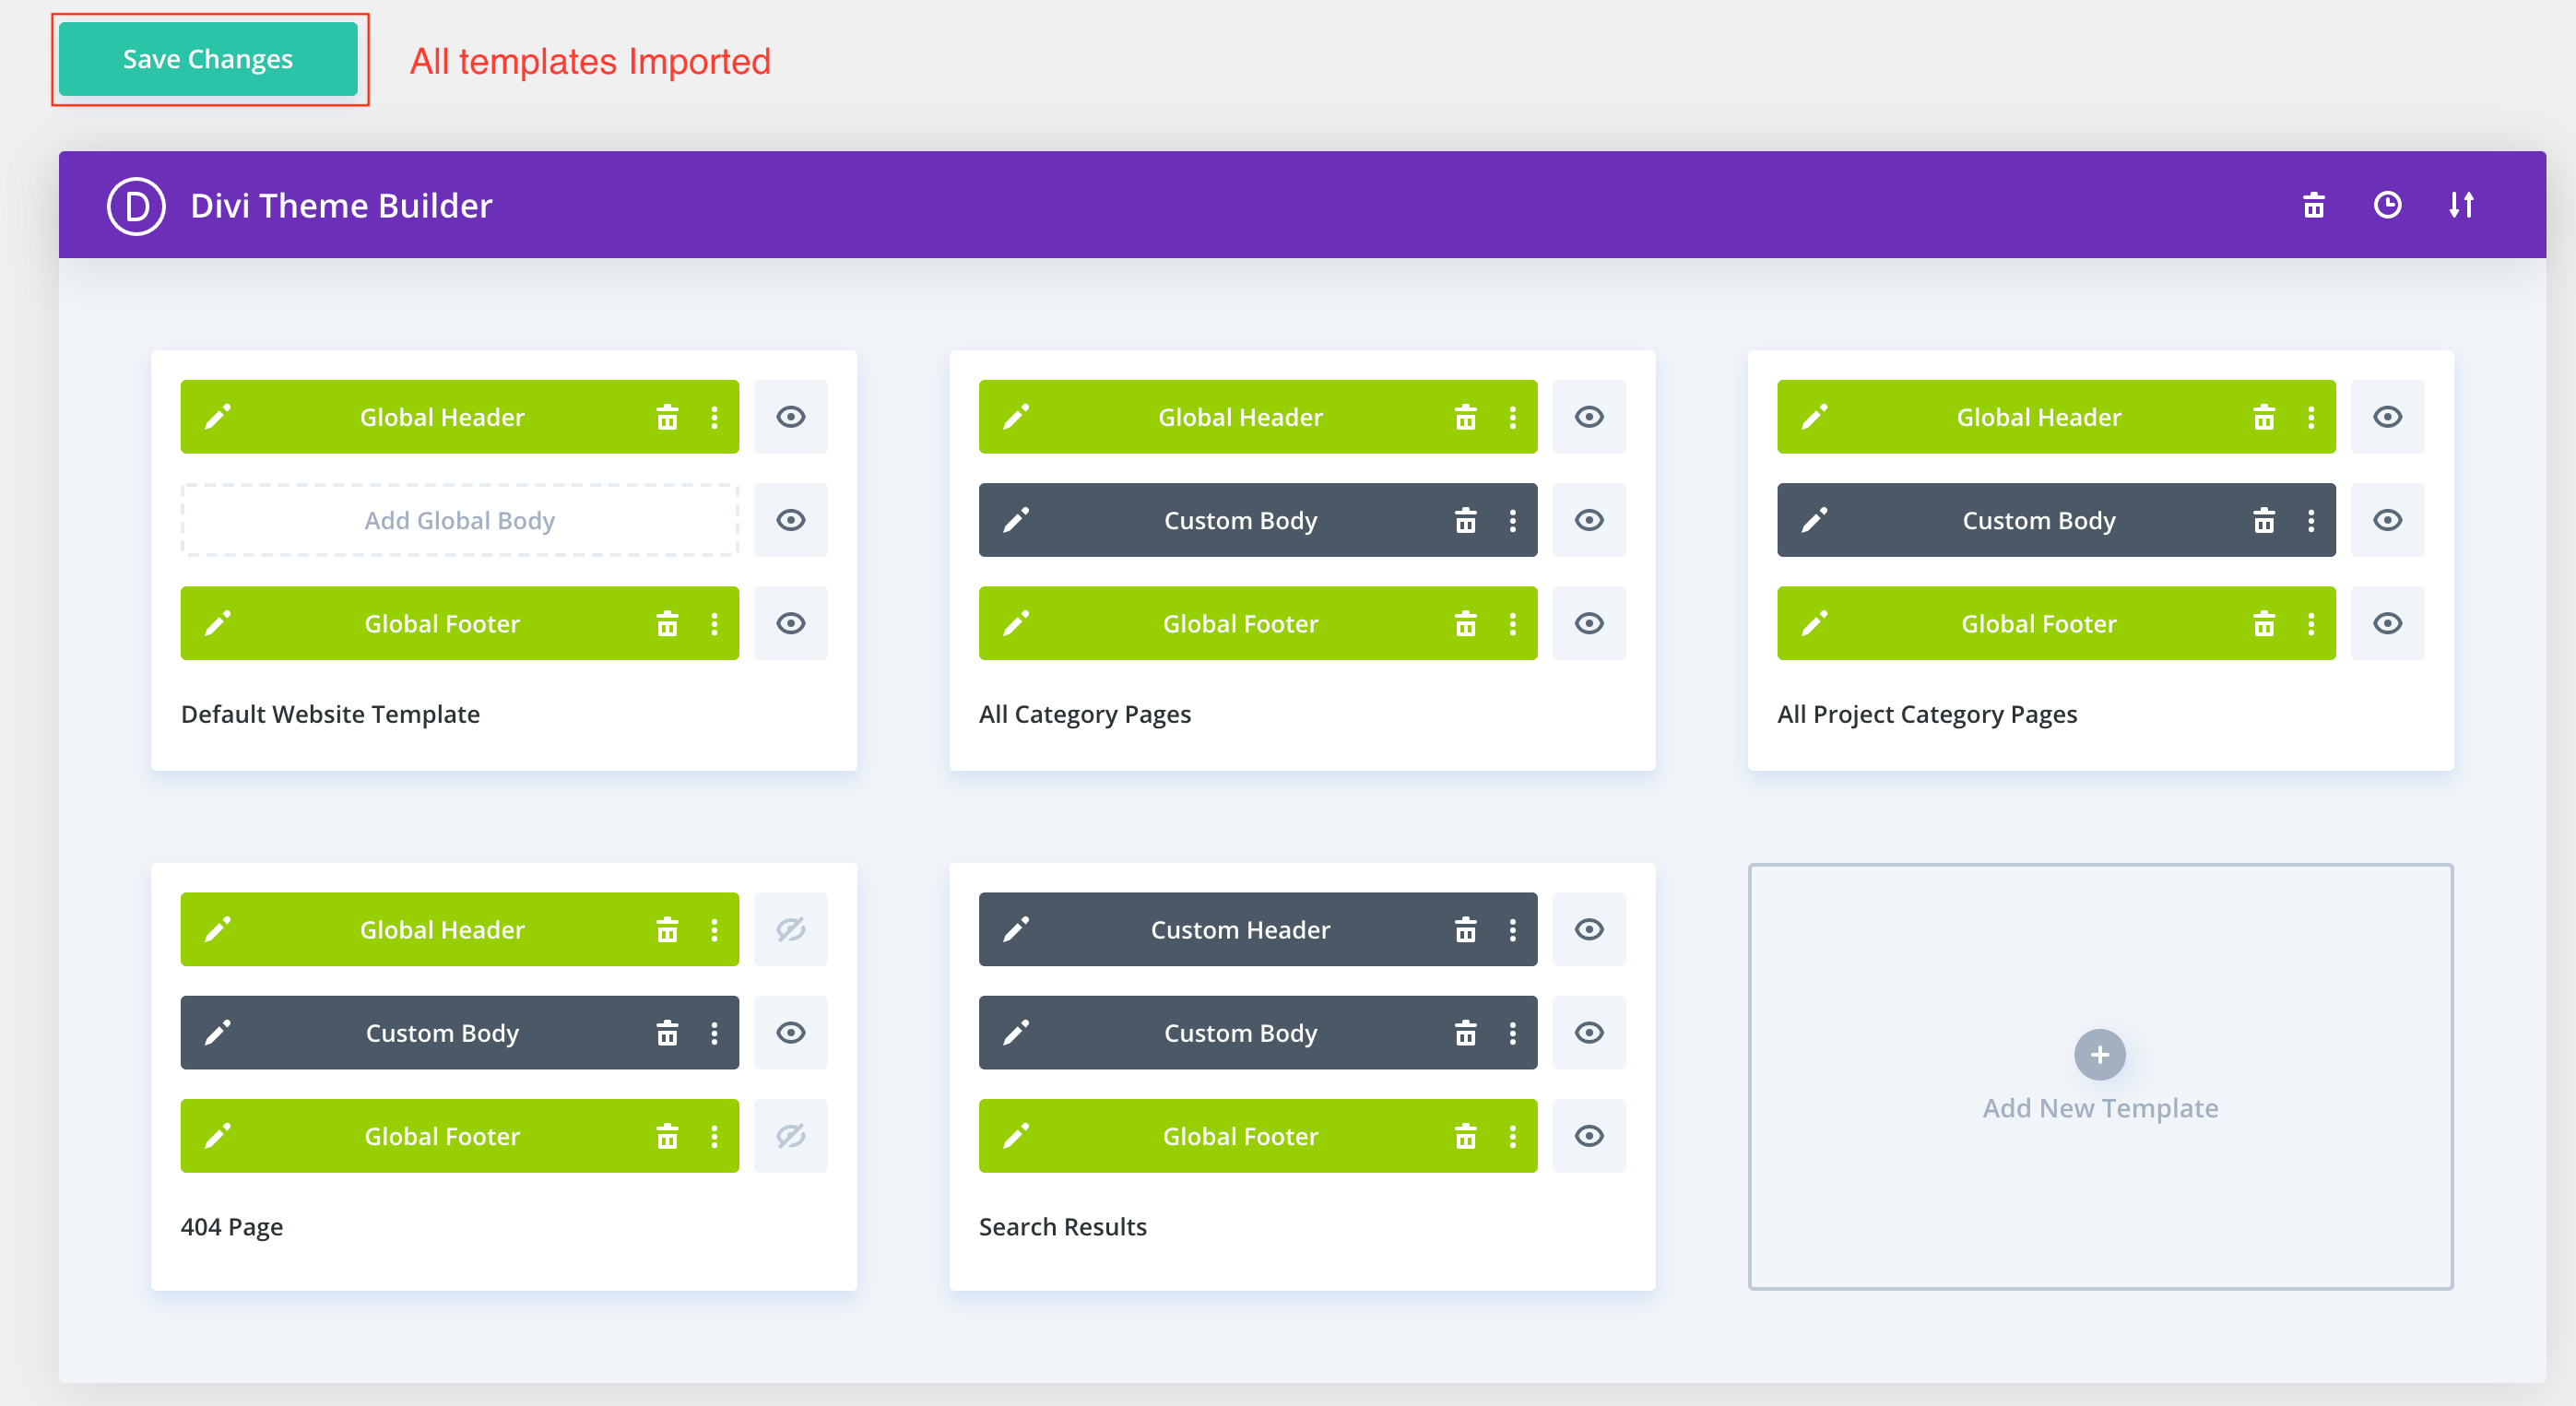
That’s it! All the templates contained in the file will be magically imported to your website with all the Global areas and assignments in place.
Now go to support instructions and see how to edit footer and/or header.
Divi visual builder is not loading? There are plenty of reasons for this and more often there are no errors to help you solve the issue.
However, there are few things you can try out and see if the problem goes off.
Change PHP settings
The first thing you can probably do is to customize or change various PHP settings and see if that solves your problem. Below are the most important PHP limits you must tweak for optimal functioning of WordPress.
WordPress 4.8 or higher
MySQL 5.6 or higher
PHP 5.6 or higher
PHP Memory Limit: 256 MB or higher
PHP Time Limit: 300 seconds or higher
PHP Maximum POST Size: 512 MB or higher
PHP Maximum Input Variables: 3000 or higher
PHP Remote GET: Enabled
Xdebug: Disabled
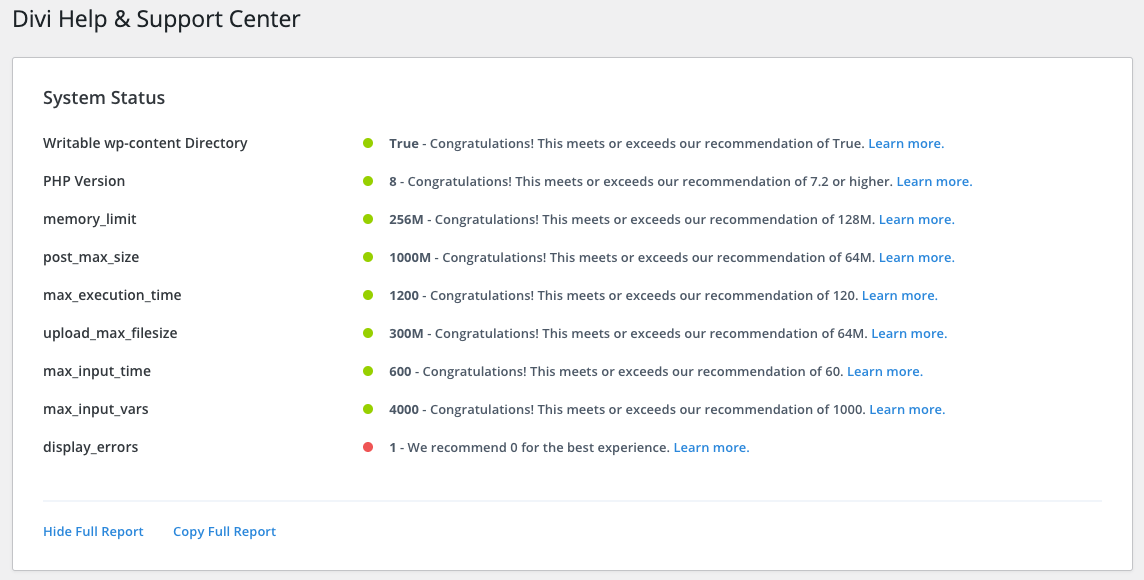
Check Divi Support Center
Go to Divi > Support Center > Check if you have the recommended values for the various PHP directives.
Below is the screenshot of the same.
Remove Cache
Cache! You will never know what’s being cached and what is not and that’s a tricky area to understand as well.
The best thing you can do is to try removing the cache once you update WordPress, theme or a plugin. It could be a browser cache, plugin cache or a server side cache.
In my case, I had been using W3TotalCache for boosting the performance of my Divi site.
- If you are using W3TotalCache, then you may try clearing the cache by going to
Performance > Dashboard.
- Un-check “
Disable wp-embed script” option under “User Experience” section in Performance > General Settings
Most users have confirmed that un-checking “Disable wp-embed script” option solved the visual builder loading issue.
The PCLZIP_ERR_BAD_FORMAT (-10): Unable to find End of Central Dir Record signature error is caused by one of two things as below:

Case 1: There’s a problem with the zip file or its format.
It’s possible that the theme zip file became corrupted when it was downloaded.
Try downloading it from your account and try again.
Case 2: Server Disk Space Issue
If you still receive the same error while trying to install it again, then it may mean that there’s not enough storage space on your host for WordPress to be able to unzip and upload the contents of the file.
To confirm this, try to upload other files to your sites, such as an image, video or other plugin. If you’re not able to upload large files, then storage space is likely the issue.
You can either remove some files (backups or themes & plugin that you’re not using), clear cache or contact your web host to increase your storage capacity.
It looks like some pages don’t download their css and display raw (blue buttons, no style, not the right font…).
The Fix: There are a few steps you can take to ensure your edits are applied:
- Disable Cache: The most common issue is that you have some sort of caching plugin such as WP Fastest Cache installed and caching your CSS. If you do, you should disable it.
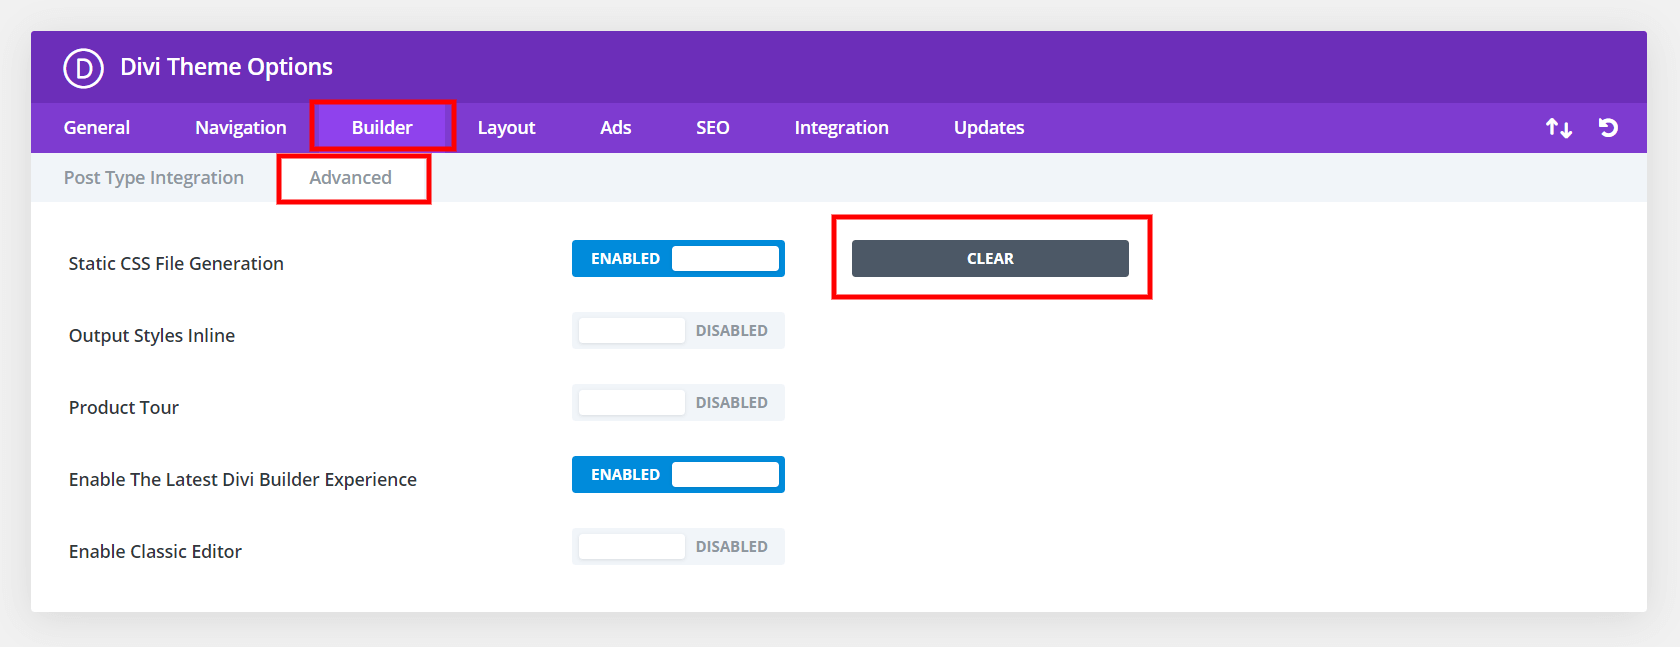
- Divi Customizer: Divi has own cache settings so Go to Divi > Theme Options > Builder > Advanced > Disable Static CSS File Generation.
Once you can see it loads fine, you can enable options and reactivate cache plugin.
If you have a previous theme with a Home page, demo includes a Home Page so you´ve got 2 Home pages.
The Fix: Make sure you´ve imported demo and Go to Settings > Reading. > Find the correct Home Page >
Then navigate to the frontend of your website to see how that static page has become your homepage.
Sometimes when you try to upload your custom font in Divi (.ttf or .otf font), you encounter this message:
“Sorry, this file type is not permited for security reasons”
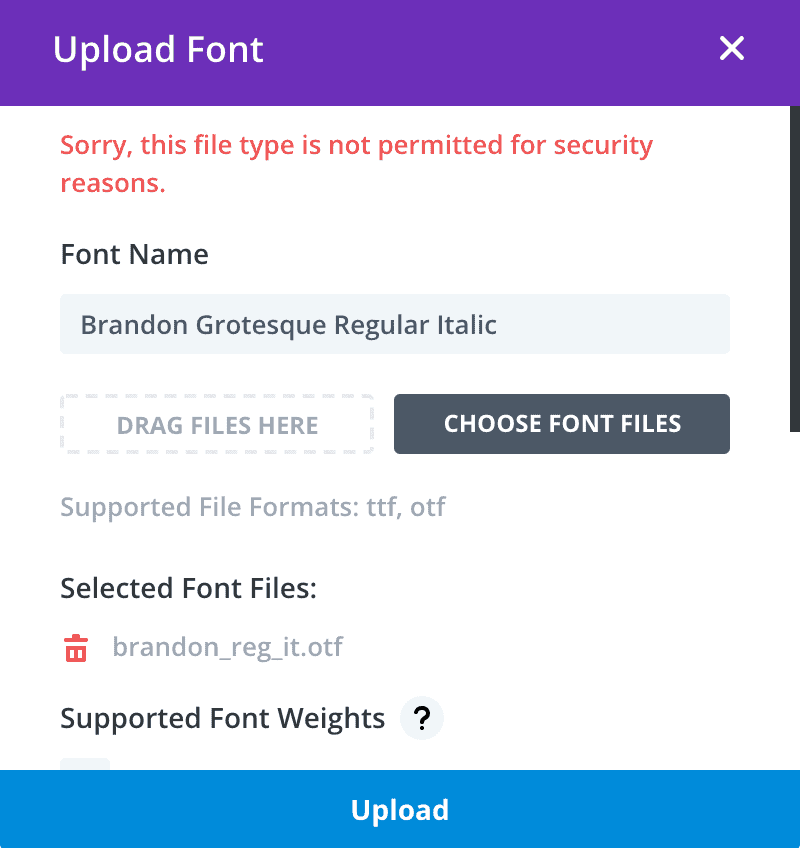
The error cause because of WordPress file upload validation. WordPress does not support uncommon Mime Types.
Solution 1:
Connect to your site’s server using FTP , you can find your functions.php file inside your theme’s folder located in the wp-content directory. Right-click on the file and select View/Edit.
Find your wp-config.php file inside your WordPress folder.
Right-click on the file and select View/Edit.
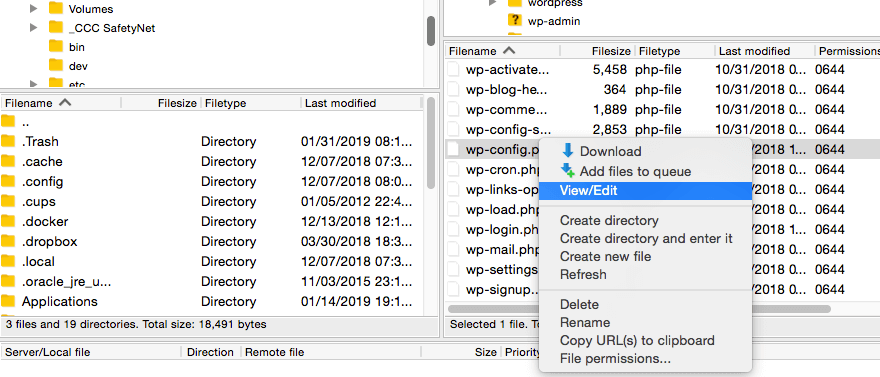
Add the following code to the file, anywhere above the line reading “/* That’s all, stop editing. Happy blogging. */”:
define('ALLOW_UNFILTERED_UPLOADS', true);
Solution 2:
- Install and activate the plugin WP Extra File Types on your WordPress, and then follow this step.
- Go to the WordPress dashboard and select Setting > Extra File Types option inside the Setting section.
- You will see the file types that come with this plugin. Select .ttf TrueType Font.
- Save changes.
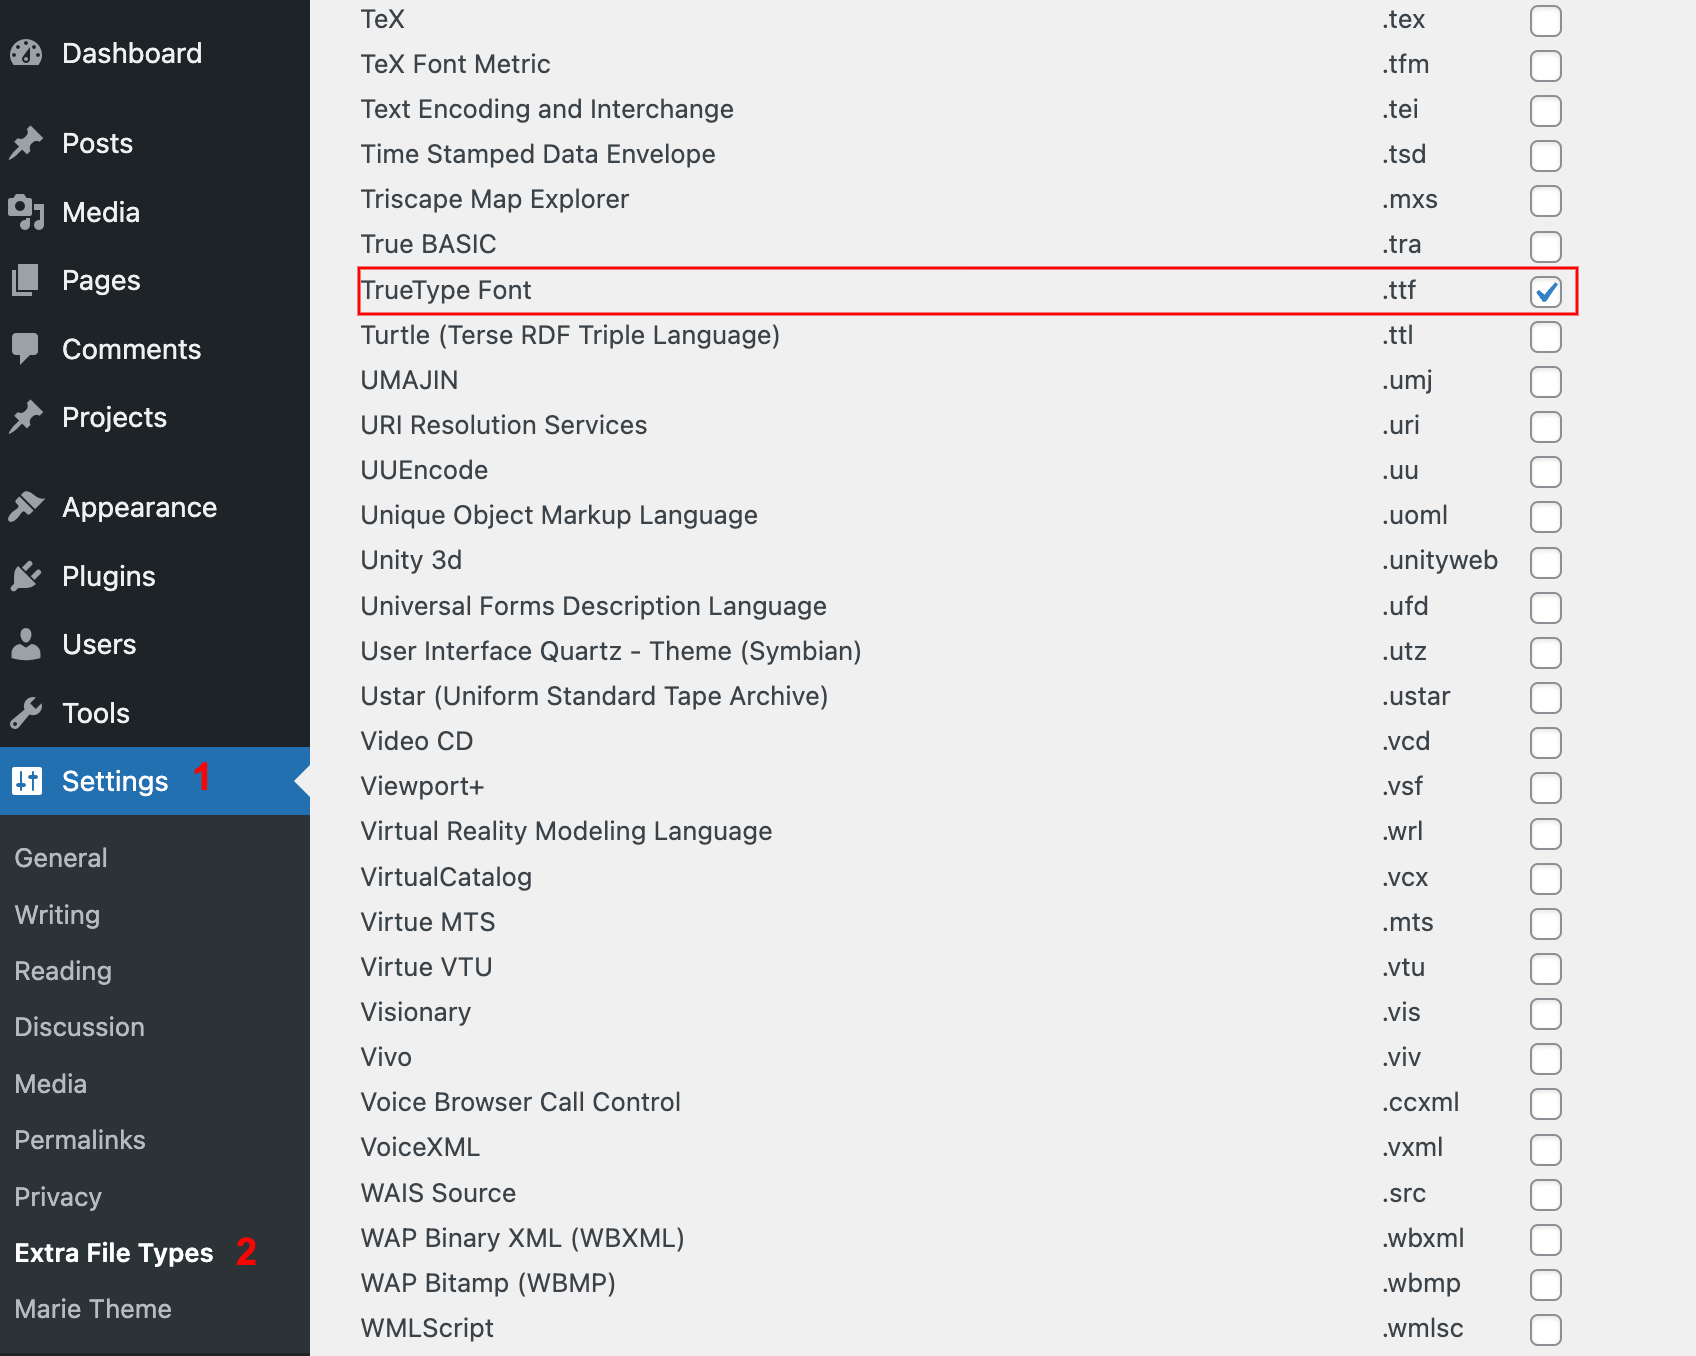
It is worth reminding you in case after adding support for a file type; you are unable to upload the file, you need to select the first option of this plugin’s settings and save changes again.

Divi is constantly updating their core files and here’s some tips and tricks to help you get a quick fix and help you make your Divi life easier.
Step 1: Clear Browser Cache/Cookies
Browser Cache – a place on your computer or device where your browser stores the information about a website that doesn’t change often. Rather than downloading the same information every time you visit the website, the browser pulls the information from its memory. The web page loads faster and the network uses less data.
I think it’s good to have this practice everytime you update your Divi or any plugins because your browser is still using the cached files.
- If you are on Windows, CTRL + F5 will do the trick on all major browsers.
- For Mac users, press Command + Shift + R buttons.
Step 2: Increase WordPress Memory Limit on your hosting
Check server settings. This is as simple as going to Divi > Support center. You may see the following message:

To address memory limit issues, there are two paths:
Adjust it yourself or Contact your hosting company
FTP to your web hosting and edit your wp-config.php file
Add this to the very bottom:
define('WP_MEMORY_LIMIT', '256M');
WooCommerce recommends at least 64M. 128M should be enough for most sites, but if you run resource intensive plugins, you may have to go higher. You can increase it incrementally until you can complete the task that triggered the message.
Step 3: Download Divi Tweaker
One of the best Divi plugin so far. A Divi Tweak Tool that make your Divi fly high without coding. Speed optimizing, page transitions and more. This plugin has a option to allow you to display a button on the Divi Page Builder area to clear the localStorage on your browser. Use this when you are experiencing Quota Exceeded for copy and paste module. This is very useful when Divi or 3rd party modules get updated.
By clicking on Clear Divi localStorage, you are able to open up modules and also copy and paste without issue. You can download them at https://diviwebdesign.com/store/divi-custom-modules/divi-tweaker/
Installing One Click Demo Import plugin is fairly simple. However, from time to time the process can fail. There are a couple of reasons for this to happen.
The demo import process consumes server resources, because it gets files from the cloud (like images, configuration files and more) and processes them in order to perfectly match your new site like the one on the actual demo site. And this consumes server resources, so if your site is on a shared server with limited resources it can also fail.
Requirements
The one click demo importer need to meet the following requirements in order to work correctly. Please have in mind that you can check these by going to your system status page. If you don’t meet the requirements you will need to contact your hosting provider in order to make the changes.
- WordPress 4.8 or higher
- MySQL 5.6 or higher
- PHP 5.6 or higher
- PHP Memory Limit: 256 MB or higher
- PHP Time Limit: 300 seconds or higher
- PHP Maximum POST Size: 32 MB or higher
- PHP Maximum Input Variables: 3000 or higher
- PHP Remote GET: Enabled
- Xdebug: Disabled
Go to Divi > Support Center > Check if you have correct WordPress configuration.
Requirements: https://bit.ly/35rUcFf
If you still have trouble installing the demo with the one click importer you can try to do it manually. Please have in mind that you will need to have the required plugins installed and active. After that, all you need to do is to follow these simple steps.
Import The Demo XML file and The Theme Options.
- On your WordPress Dashboard, go to Tools → Import → WordPress.
- Install the WordPress Importer.
- Browse for the XML file (demo archives folder) and import it.
- All of the demo content should now be uploaded to your site and ready to use.
Set Up the Front Page
- Go to your WordPress Dashboard → Settings → Reading panel.
- Set ‘Front page displays:’ to ‘a static page’ and choose the home page.
- Save changes.
Configure The Navigation Menu
- Go to your WordPress Dashboard → Appearance → Menus
- Assign the navigation menu to a theme location. This is really important because it will be the location in which the menu you’ve created and edited will be appearing.
- Save Changes.
By default the default WordPress url structure isn’t very “pretty” much less SEO-Friendly. So when you first setup your website URLS might look ugly (a mish-mash of the post ID, publish date, post title and even the category).

The Fix: simply go to Settings > Permalinks and change your setting to the “Post Name” option (or any of the others – just choose the one that best works for you).
You’ve got your theme installed and now you are uploading a sample .xml file and get an error! For example: “Failed to import media”.
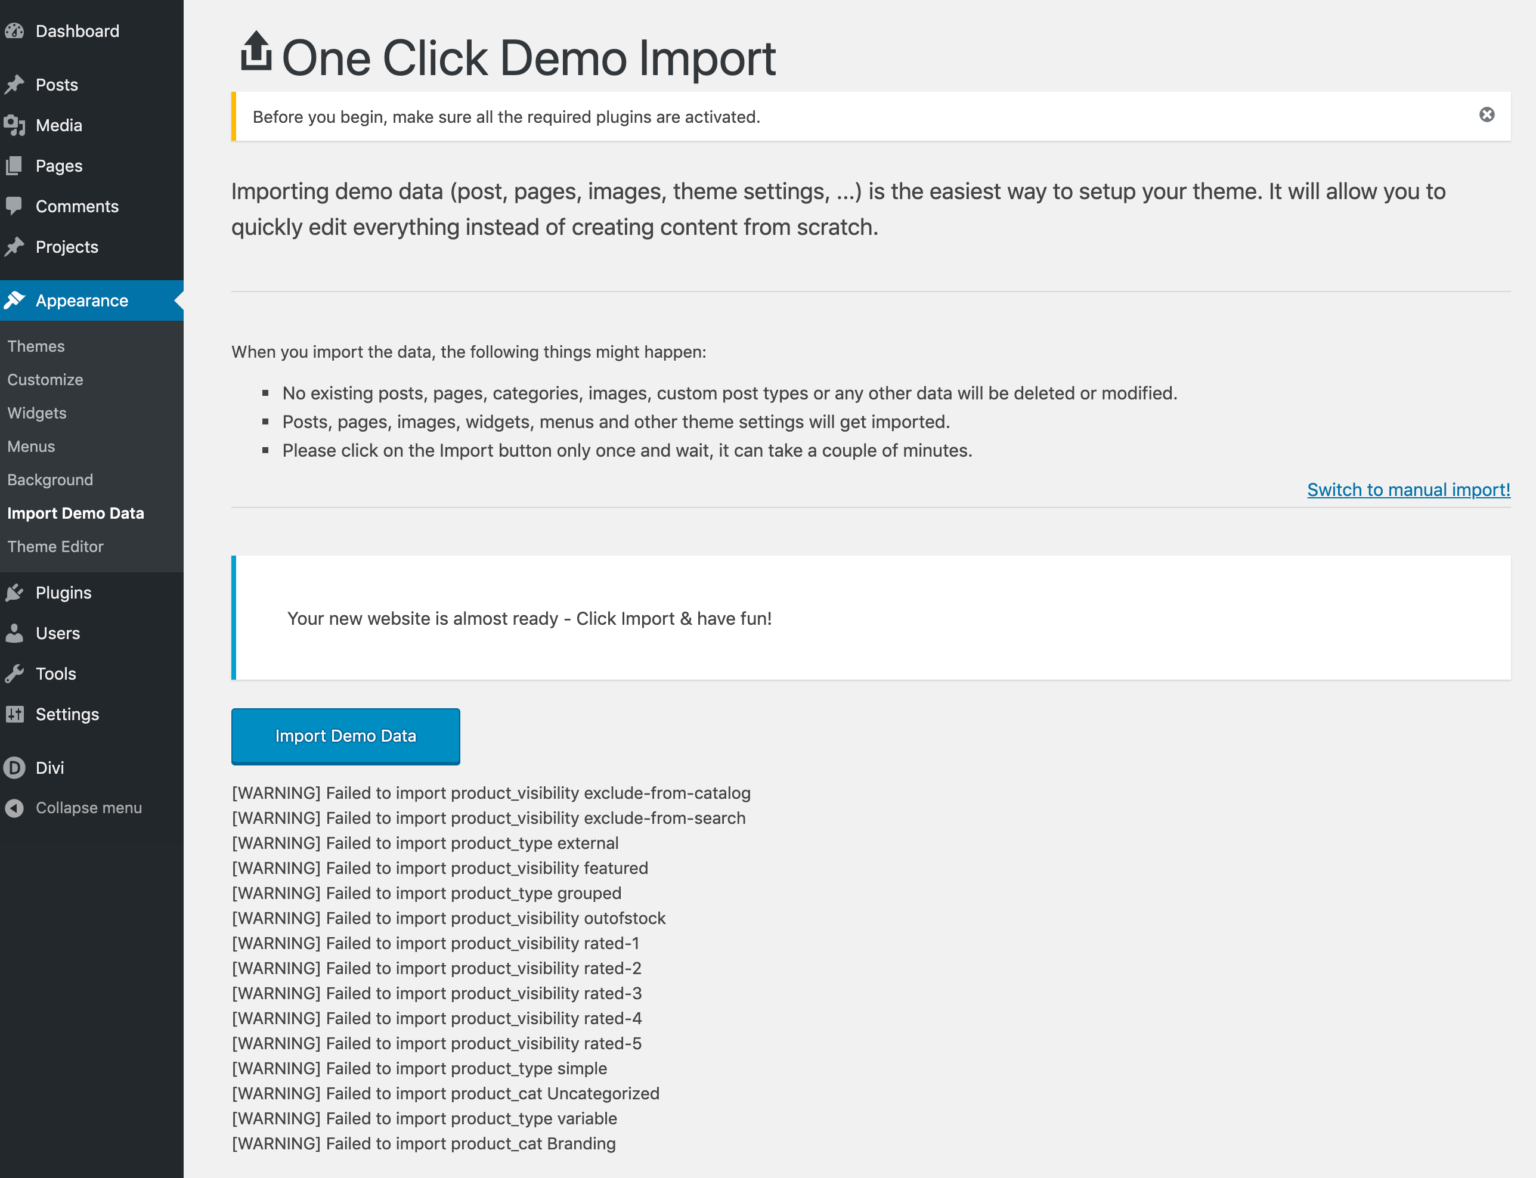
The Fix: Demo content comes with products.
If you do not intend to sell any product or install WooCommerce plugin you can ignore it.
If you are going to install WooCommerce, install it, activate it and re-import the content.